Perfect Hosomaki Sushi Rolls – Authentic Japanese Recipe & Step-by-Step Guide
Master the Art of Hosomaki: Your Complete Guide to Perfect Japanese Thin Sushi Rolls
Introduction
There’s a moment of pure magic when you slice through your first homemade hosomaki roll and see those perfect spirals—the dark nori contrasting with pearly white rice, a vibrant strip of filling perfectly centered like a jewel. It’s the moment you realize that yes, you really can make restaurant-quality sushi at home, and it’s far easier than you ever imagined.
Hosomaki, literally meaning “thin roll” in Japanese, represents sushi in its most elegant and refined form. Unlike the oversized, mayo-laden rolls you might find at fusion restaurants, hosomaki celebrates simplicity and technique. Each roll contains just one type of filling, allowing you to truly taste the quality of each ingredient. It’s sushi stripped down to its essential elements: perfectly seasoned rice, crisp nori, and a single, carefully chosen filling.
What makes hosomaki so special is its accessibility. You don’t need years of training or expensive equipment to create these delicate rolls. With a bamboo mat, a sharp knife, and a little practice, you’ll be rolling hosomaki that would make any sushi chef nod in approval. The process is almost meditative—spreading the rice, placing the filling, the gentle but firm rolling motion—it all comes together in a ritual that’s been perfected over centuries.
Why You’ll Love This Recipe
You’re about to discover why hosomaki has become the gateway drug to homemade sushi for so many home cooks. First, it’s incredibly forgiving. Unlike nigiri, which requires perfect rice molding and knife skills, or inside-out rolls that can be tricky to master, hosomaki’s straightforward rolling technique means you’ll likely succeed on your very first attempt.
The customization possibilities are endless. Traditional fillings like cucumber (kappa maki) or tuna (tekka maki) are just the beginning. Once you master the basic technique, you can experiment with any ingredient that strikes your fancy—from pickled vegetables to cooked shrimp, from avocado to grilled salmon. Each roll becomes a canvas for your creativity.
Most importantly, making hosomaki at home is incredibly economical. A single batch of sushi rice can yield dozens of pieces, and when you consider that a simple cucumber roll at a restaurant might cost $5-8, the savings add up quickly. Plus, you have complete control over the quality and freshness of your ingredients, ensuring every bite is exactly to your liking.
Ingredients Breakdown
The beauty of hosomaki lies in its minimalist ingredient list, but this simplicity means each component must be perfect. Let me guide you through everything you’ll need and share the secrets that transform ordinary ingredients into extraordinary sushi.
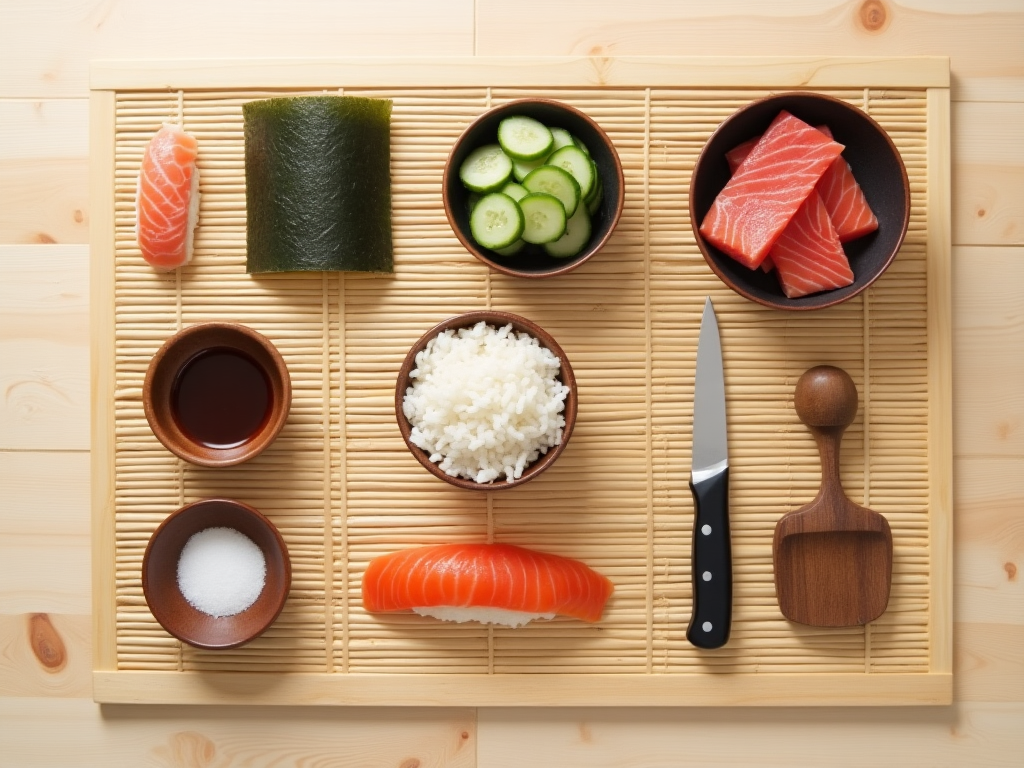
Sushi Rice (2 cups uncooked, about 4 cups cooked) This is your foundation, and getting it right is crucial. Use short-grain Japanese rice—brands like Koshihikari or Calrose work beautifully. The short grains contain more starch, creating that characteristic sticky texture that holds your rolls together. Long-grain rice simply won’t work here; it lacks the starch content and will result in rolls that fall apart. Rinse your rice until the water runs clear—this removes excess starch that would make your rice gummy rather than sticky.
Rice Vinegar (1/4 cup) Seasoned rice vinegar transforms plain rice into sushi rice. Look for unseasoned rice vinegar so you can control the flavor balance yourself. The acidity not only adds flavor but also acts as a natural preservative, which is why sushi rice can sit at room temperature during service. Apple cider vinegar can work in a pinch, though the flavor will be noticeably different.
Sugar (2 tablespoons) This might surprise sushi newcomers, but sugar is essential in sushi rice. It balances the vinegar’s acidity and helps achieve that subtle sweet-savory flavor that makes sushi rice so addictive. Use regular granulated sugar—it dissolves easily and provides clean sweetness without additional flavors.
Salt (1 teaspoon) Salt enhances all the other flavors and helps preserve the rice. Use fine sea salt or kosher salt for the best flavor. The salt, sugar, and vinegar combination creates what’s called “sushi-zu,” the seasoning that transforms regular rice into sushi rice.
Nori Sheets (1 package, about 10 sheets) These dried seaweed sheets are your wrapper. Quality matters here—look for nori that’s dark green to black, with a subtle shine. Good nori should be crispy and break cleanly. Store opened packages in an airtight container with the included desiccant packet to maintain crispness. If your nori feels soft or chewy, toast it briefly over an open flame to restore its crispness.
Traditional Filling Options:
Cucumber (1 English cucumber) For kappa maki, use English or Persian cucumbers—they have fewer seeds and better crunch. Cut into long matchsticks about 1/4 inch thick. The key is uniformity; consistent cuts ensure even distribution and easier rolling. Pat the strips dry to prevent excess moisture from making your rolls soggy.
Tuna (8 oz sashimi-grade) For tekka maki, only use sashimi-grade tuna from a reputable fishmonger. The deep red color and clean taste of quality tuna makes all the difference. Cut against the grain into long strips about 1/2 inch thick. If you’re nervous about raw fish, you can use canned tuna mixed with a little mayo as a beginner-friendly alternative.
Salmon (8 oz sashimi-grade) Similar to tuna, quality is paramount. Look for bright orange-pink flesh with clear white lines of fat. Scottish or Norwegian salmon are excellent choices. Some prefer to lightly sear the outside for added flavor and food safety—this is called “aburi” style.
Additional Ingredients:
- Wasabi paste: Real wasabi is ideal but rare; most “wasabi” is actually horseradish with green coloring, which works fine
- Pickled ginger (gari): For palate cleansing between different rolls
- Soy sauce: Use Japanese soy sauce (shoyu) rather than Chinese varieties for authentic flavor
- Sesame seeds: Optional, for garnishing certain variations
Step-by-Step Instructions
Now for the main event—transforming these simple ingredients into perfect hosomaki. Take your time with each step; sushi-making is as much about the journey as the destination.
Step 1: Prepare the Perfect Sushi Rice (45 minutes) Start by washing 2 cups of rice in cold water, gently swirling with your hand. Drain and repeat 4-5 times until the water runs clear. This removes excess surface starch that would make your rice gloppy. Add the rice to your rice cooker with 2.5 cups of water (or follow your cooker’s sushi rice setting). If using a pot, bring to a boil, then reduce to low heat, cover, and simmer for 18 minutes. Remove from heat and let stand, covered, for 10 minutes—this steaming period is crucial for achieving the right texture.
While the rice cooks, prepare your sushi-zu by combining rice vinegar, sugar, and salt in a small saucepan. Heat gently until the sugar and salt dissolve completely—don’t let it boil. Once dissolved, let it cool to room temperature.
Step 2: Season and Cool the Rice (15 minutes) Transfer the hot rice to a large wooden or plastic bowl (metal can react with the vinegar). Drizzle the sushi-zu over the rice while using a cutting motion with a rice paddle or wooden spoon—never stir in circles as this breaks the grains. As you mix, fan the rice with your other hand or have someone help you. This rapid cooling gives the rice its characteristic glossy appearance and prevents it from becoming mushy. The rice should be body temperature when you’re ready to roll.
Step 3: Prepare Your Fillings (10 minutes) While the rice cools, prepare your fillings. For cucumber, peel if desired (keeping the peel adds color and nutrients), then cut into long strips about the thickness of a pencil. For fish, use a sharp knife to cut against the grain into strips about 1/2 inch thick and as long as your nori sheet is wide. Keep fish refrigerated until the moment you’re ready to use it. Have a damp towel ready to clean your knife between cuts.
Step 4: Set Up Your Rolling Station (5 minutes) Organization is key to smooth rolling. Place your bamboo mat on a clean, dry surface. Have a bowl of water mixed with a splash of rice vinegar for your hands—this prevents rice from sticking. Lay out your nori sheets, keeping unused ones covered. Position your fillings within easy reach, along with a sharp knife and damp towel for cleaning it between cuts.
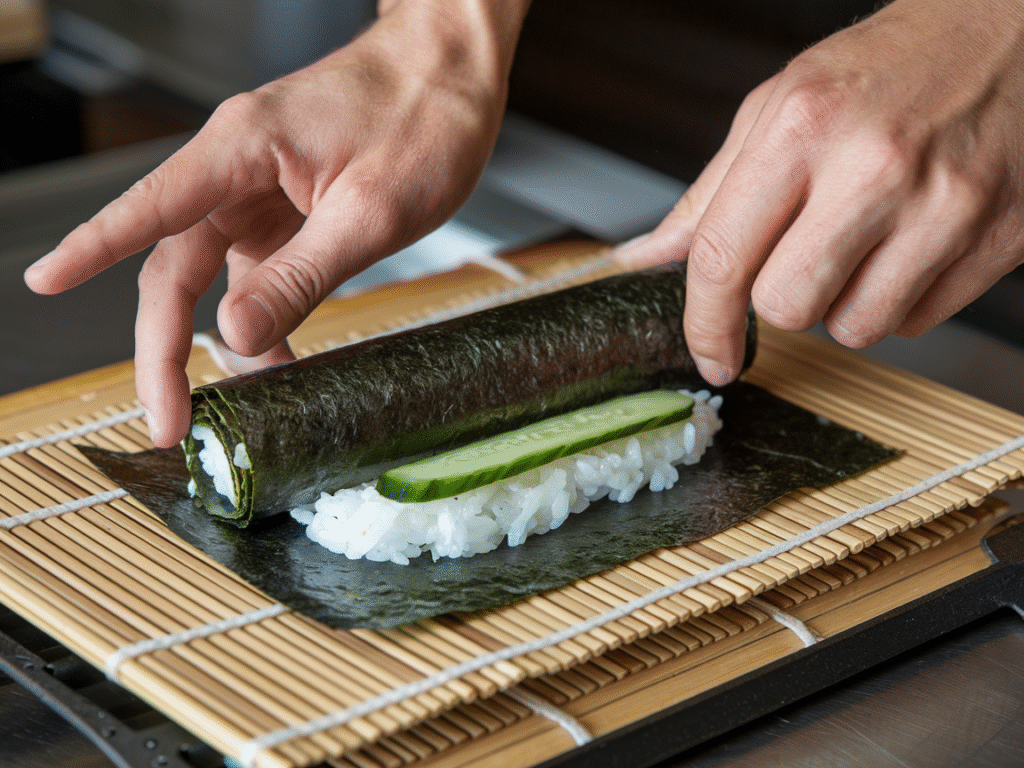
Step 5: Spread the Rice (2 minutes per roll) Place a sheet of nori on your bamboo mat, shiny side down. Wet your hands in the vinegar water and grab about 3/4 cup of rice. Starting from the edge closest to you, spread the rice evenly across the nori, leaving about 1 inch of bare nori at the far edge. The rice layer should be about 1/4 inch thick—you should be able to see the nori slightly through the rice. Press gently but don’t compact the rice; you want it to remain fluffy.
Step 6: Add Filling and Roll (2 minutes per roll) Place your filling in a line across the rice, about 1/3 of the way up from the bottom edge. For cucumber, use 2-3 strips; for fish, one strip is usually sufficient. Using the bamboo mat, lift the edge closest to you and roll it over the filling, tucking it slightly under. Apply gentle, even pressure to compress the roll slightly. Continue rolling, using the mat to shape but being careful not to roll the mat into the sushi. When you reach the bare nori edge, wet it slightly with water to seal.
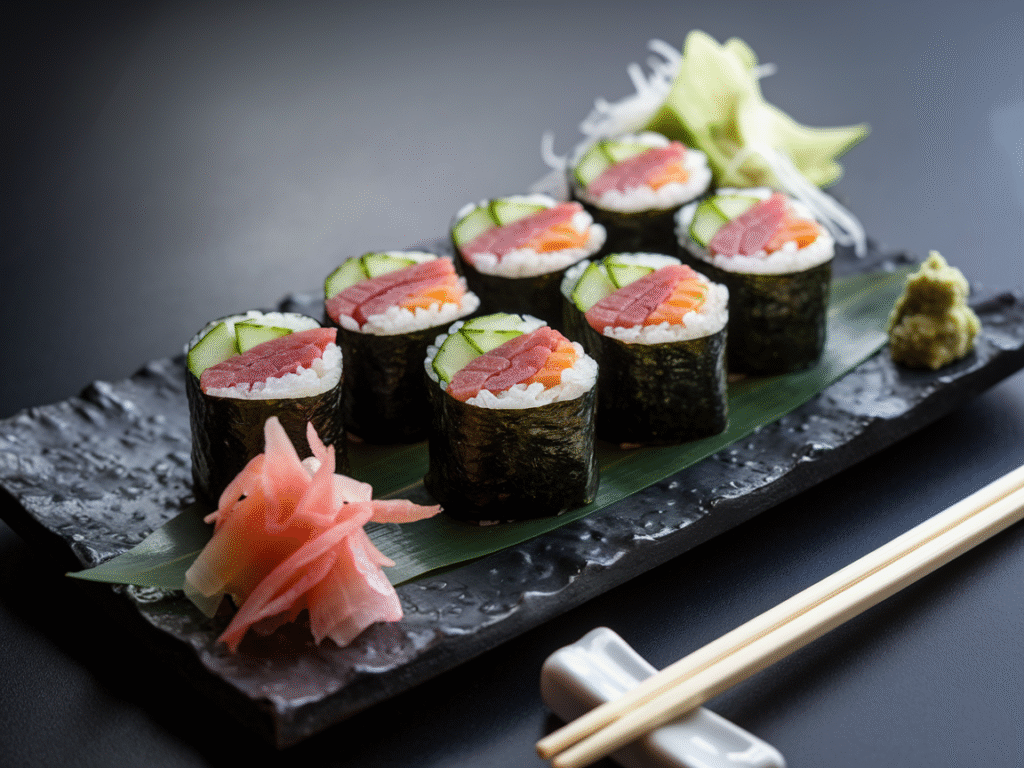
Step 7: Slice and Serve (1 minute per roll) Let the roll rest seam-side down for a minute to ensure the seal holds. Using a very sharp knife dipped in water, cut the roll in half, then cut each half into 3 pieces, cleaning and re-wetting the knife between cuts. This gives you 6 uniform pieces. Arrange on a plate with pickled ginger and wasabi.
Tips and Variations
After years of rolling hosomaki, I’ve learned tricks that transform good rolls into exceptional ones. Here’s my arsenal of pro tips and creative variations.
Expert Tips for Flawless Hosomaki:
Temperature is everything. Your rice should be body temperature when rolling—too hot and it’ll cook the nori and make it tough; too cold and it won’t stick properly. Your filling ingredients, especially fish, should be well-chilled for food safety and optimal texture.
Invest in a properly sharp knife. A dull knife will crush your rolls rather than slice them. If you don’t have a sushi knife (yanagiba), a sharp chef’s knife works fine. The key is one confident motion per cut—sawing back and forth destroys the roll’s structure.
Don’t overfill. Hosomaki literally means “thin roll,” and restraint is key. Too much filling makes rolling difficult and results in loose, falling-apart pieces. Less is definitely more here.
Practice your rice spreading. The most common beginner mistake is uneven rice distribution. Aim for consistency—thick spots make lumpy rolls while thin spots can tear.
Creative Variations:
Spicy Tuna Hosomaki: Mix diced sashimi-grade tuna with sriracha mayo (2 parts mayo, 1 part sriracha) and a drop of sesame oil. This modern twist adds creamy heat while maintaining the traditional thin roll format.
Vegetarian Rainbow: Try pickled radish (takuan) for crunch and tang, blanched asparagus for green freshness, or roasted red pepper strips for sweetness. Marinated shiitake mushrooms offer umami depth that rivals any fish.
Fusion Inspirations: Cream cheese and smoked salmon create a “Philadelphia” hosomaki. Tempura shrimp pieces with spicy mayo bring crunch. Even thin strips of grilled chicken teriyaki work beautifully.
Inside-Out Mini: For variation, try making miniature inside-out rolls by placing rice on the outside and nori inside—just use less rice and filling than usual to maintain the thin profile.
Serving Suggestions
Presentation transforms hosomaki from simple food into an experience. In Japan, the visual appeal of food is considered as important as taste, and your hosomaki deserves the same attention.
Traditional Presentation: Arrange your hosomaki pieces in a line on a rectangular plate, alternating different types for visual interest. Place a small mound of pickled ginger at one corner and a dab of wasabi at another. Serve soy sauce in separate small dishes—never pour it directly over the sushi. Add a folded damp towel (oshibori) for guests to clean their hands.
Modern Plating Ideas: Create a rainbow effect by arranging different colored hosomaki in an arc. Use black slate plates to make the colors pop. Garnish with microgreens, black sesame seeds, or thin lemon slices. Dot the plate with spicy mayo or eel sauce in decorative patterns—but remember, less is more.
Complete Meal Suggestions: Start with miso soup and edamame. Serve your hosomaki alongside a simple cucumber salad (sunomono) dressed with rice vinegar and sesame seeds. Tempura vegetables or agedashi tofu make excellent accompaniments. For dessert, consider dorayaki (pancake sandwiches with sweet filling) or mochi ice cream.
Beverage Pairings: Green tea is classic—sencha during the meal, hojicha after. For alcohol, sake served slightly chilled complements the clean flavors. Japanese beer like Asahi or Sapporo offers refreshing contrast. For wine lovers, a crisp Grüner Veltliner or Albariño works wonderfully.
Storage and Reheating Instructions
While hosomaki is definitely best enjoyed immediately, proper storage can extend your enjoyment when you’ve made more than you can eat.
Short-Term Storage (Up to 24 hours): Wrap individual rolls tightly in plastic wrap before cutting. Store in an airtight container in the refrigerator. The rice will harden slightly, but this method preserves the nori’s texture better than storing cut pieces. When ready to eat, let them come to room temperature for 15 minutes before cutting and serving.
Refrigerator Storage for Cut Pieces: If you must store cut hosomaki, arrange pieces in a single layer in an airtight container, separated by parchment paper. Cover with a slightly damp paper towel before sealing. Consume within 24 hours for best quality. The nori will soften, but the flavors remain good.
Why Freezing Doesn’t Work: Unfortunately, hosomaki doesn’t freeze well. The rice becomes grainy and dry, the nori turns tough, and raw fish becomes mushy when thawed. Vegetable fillings lose their crunch. If you want to prep ahead, prepare all components separately and assemble fresh.
Reviving Refrigerated Hosomaki: Remove from refrigerator 20 minutes before serving to bring to room temperature. If the rice seems dry, very lightly brush with water mixed with rice vinegar. For the best experience, though, consider deconstructing refrigerated rolls and making chirashi bowls instead.
Recipe Notes
These insider details will elevate your hosomaki game from amateur to accomplished:
Prep everything before you start rolling. Once you begin, wet hands and rice make it difficult to stop and prepare forgotten items.
Keep a “test roll” mindset for your first attempt. Use cucumber since it’s inexpensive, and consider this your practice round to get a feel for rice amount and rolling pressure.
The bamboo mat is traditional but not absolutely essential. In a pinch, a clean dish towel or even careful hand-rolling can work, though the results won’t be as tight or uniform.
For party prep, you can spread rice on nori sheets up to 30 minutes before rolling, covering with damp towels. This streamlines assembly when guests arrive.
Always buy more nori than you think you need. Sheets can tear, and having extras removes pressure while learning. Unopened nori keeps for years when stored properly.
Consider keeping a sushi journal noting your rice-to-vinegar ratios and favorite filling combinations. Small adjustments make big differences, and tracking helps you perfect your personal style.
Nutrition Information (Per Serving – 6 pieces)
| Nutrient | Amount |
|---|---|
| Calories | 185 |
| Total Fat | 0.5g |
| Saturated Fat | 0.1g |
| Carbohydrates | 40g |
| Sugar | 4g |
| Fiber | 1.5g |
| Protein | 4g |
| Sodium | 380mg |
| Cholesterol | 0mg |
| Calcium | 20mg |
| Iron | 1.2mg |
Nutrition information is an estimate and may vary based on specific ingredients used.
Recipe Card Summary
Course: Appetizer/Main Dish
Cuisine: Japanese
Servings: 4 (24 pieces)
Prep Time: 30 minutes
Cook Time: 20 minutes
Total Time: 50 minutes
Ingredients:
- 2 cups short-grain sushi rice
- 2.5 cups water
- 1/4 cup rice vinegar
- 2 tablespoons sugar
- 1 teaspoon salt
- 4 nori sheets
- Filling of choice (cucumber, tuna, or salmon)
- Wasabi paste for serving
- Pickled ginger for serving
- Soy sauce for serving
Instructions:
- Cook rice and let stand 10 minutes
- Mix vinegar, sugar, and salt; combine with rice while fanning
- Prepare fillings in long, thin strips
- Place nori on bamboo mat, spread rice leaving 1-inch border
- Add filling 1/3 from bottom, roll tightly using mat
- Rest seam-down, then cut into 6 pieces with wet knife
- Serve with wasabi, ginger, and soy sauce
Notes:
- Rice should be body temperature when rolling
- Keep knife wet and clean between cuts
- Don’t overfill—less is more with hosomaki
- Can prep components ahead but roll fresh
Diet Tags: Vegan (with vegetable fillings), Vegetarian (with vegetable fillings), Dairy-Free, Nut-Free, Gluten-Free (with tamari instead of soy sauce)
Health Benefits Section
Hosomaki offers surprising nutritional benefits that make it both delicious and nourishing. The combination of ingredients provides a balanced macro profile that satisfies without weighing you down.
Nori, the seaweed wrapper, is a nutritional powerhouse. It’s rich in iodine, essential for thyroid function, and contains unique compounds like fucoxanthin that may support metabolism. Nori also provides vitamin B12, rare in plant foods, making vegetable hosomaki especially valuable for plant-based diets.
The vinegared rice, while primarily carbohydrate, offers quick energy and the fermentation from rice vinegar may support digestive health. The vinegar also helps moderate blood sugar response compared to plain rice.
Fish-filled varieties deliver high-quality protein and omega-3 fatty acids. Tuna provides selenium and vitamin D, while salmon offers astaxanthin, a powerful antioxidant. Even cucumber rolls have benefits—they’re hydrating, low in calories, and provide silica for healthy skin and joints.
The minimal oil and absence of deep-frying makes hosomaki one of the healthiest sushi options, providing satisfaction without excessive calories or unhealthy fats.
Sauce Recommendations
While hosomaki is traditionally enjoyed with just soy sauce, wasabi, and ginger, these sauce options can add exciting dimensions to your rolls:
Classic Soy-Based Dipping Sauce: Mix 3 tablespoons soy sauce with 1 tablespoon mirin and a squeeze of lemon juice. Add a small amount of wasabi to taste. This brightened soy sauce enhances without overwhelming the delicate flavors.
Spicy Mayo (Sriracha Mayo): Combine 1/4 cup Japanese mayonnaise with 1-2 tablespoons sriracha and a few drops of sesame oil. This creamy, spicy sauce is perfect for tuna or salmon rolls. Thin with a little rice vinegar if too thick.
Ponzu Sauce: Mix 2 tablespoons soy sauce, 1 tablespoon lemon juice, 1 tablespoon orange juice, and 1 teaspoon mirin. This citrusy sauce particularly complements vegetable rolls and adds refreshing acidity.
Eel Sauce (Unagi Sauce): While not traditional for hosomaki, this sweet-savory sauce adds richness. Simmer 1/4 cup soy sauce, 1/4 cup mirin, and 2 tablespoons sugar until thickened. Drizzle sparingly—a little goes a long way.
Avoid These Mistakes During the Process
The most common mistake is using too much rice. Your rice layer should be thin enough to see nori through it. Thick rice makes rolls difficult to close and overwhelming to eat.
Never use hot rice directly from the cooker. The steam will make your nori soggy and tough. Always cool and season your rice properly first.
Avoid pressing too hard when rolling. Firm, even pressure is good; crushing force squeezes out filling and compacts rice into an unpleasant density.
Don’t skip wetting your knife between cuts. A dry knife drags through the roll, tearing nori and squashing your perfect spiral into an oval.
Resist the temptation to make rolls hours in advance. Nori loses its crispness, rice dries out, and the overall quality deteriorates significantly.
Frequently Asked Questions
Can I make hosomaki without a bamboo mat? Yes, though it’s more challenging. Use a clean kitchen towel or flexible plastic cutting board. Some people successfully hand-roll, though this takes practice. The mat is inexpensive and makes a significant difference, so it’s worth the small investment.
Is it safe to use raw fish from the grocery store? Only use fish labeled “sashimi-grade” or “sushi-grade,” which indicates it’s been frozen to eliminate parasites. Never use regular fresh fish meant for cooking. When in doubt, ask your fishmonger specifically if it’s safe for raw consumption.
Why does my nori get chewy instead of crispy? Nori absorbs moisture quickly. Store opened packages in an airtight container with the desiccant packet. If nori feels soft, wave it over a gas flame for a few seconds to re-crisp. Work quickly once rice touches nori to maintain crispness.
Can I make sushi rice in advance? Sushi rice is best used within 4 hours of making. Keep it covered with a damp cloth at room temperature, never refrigerate as this makes it hard and dry. For longer storage, it’s better to make fresh rice.
What’s the difference between hosomaki and other sushi rolls? Hosomaki uses one sheet of nori with rice on the inside and contains a single filling. Futomaki is thicker with multiple fillings. Uramaki has rice on the outside. Temaki is hand-rolled into a cone shape.
How can I make my rolls tighter? Use the bamboo mat to apply even pressure while rolling. Make sure your rice isn’t too wet, and don’t overfill. Practice the tucking motion at the start of the roll—this initial tuck determines the final tightness.
Final Thoughts
Making hosomaki at home is more than just preparing food—it’s participating in a centuries-old culinary tradition that values precision, simplicity, and respect for ingredients. Every time you spread that rice, place that filling, and execute that roll, you’re connecting with countless sushi makers who’ve performed these same motions.
What starts as perhaps fumbling attempts with too much rice or lopsided rolls quickly evolves into muscle memory and intuition. You’ll find yourself knowing exactly how much pressure to apply, how thick to spread the rice, how to achieve that perfect spiral. This progression from novice to confident hosomaki maker is incredibly rewarding.
The beauty of mastering hosomaki extends far beyond the technique itself. Once you can confidently produce these elegant thin rolls, the entire world of sushi-making opens up. Hosomaki teaches you the fundamentals—rice preparation, nori handling, rolling technique—that apply to every other type of sushi roll.
But perhaps the greatest joy comes from sharing your creations. There’s something magical about presenting a platter of homemade hosomaki to friends or family. The surprise on their faces when they realize you made “real” sushi, the satisfaction of customizing rolls to everyone’s preferences, the conversations that flow over shared plates—these moments are what cooking is really about.
Remember, even experienced sushi chefs consider themselves eternal students, always refining their technique. Don’t be discouraged if your first rolls aren’t perfect. Each attempt teaches you something new, and honestly, even imperfect hosomaki tastes delicious.
So gather your ingredients, set up your station, and embark on your hosomaki journey. Start with simple cucumber rolls to master the technique, then branch out into your favorite fillings. Experiment with different fish, vegetables, and even creative fusion fillings. Make it a weekend tradition, a date night activity, or a fun project with kids.
Whether you’re crafting a simple cucumber roll for a light lunch or preparing an assortment for a dinner party, hosomaki offers a perfect balance of tradition and creativity, simplicity and sophistication. The skills you develop and the joy you’ll find in the process are just as valuable as the delicious results.
Let me know how your hosomaki adventure unfolds! Drop a comment below sharing your favorite filling combinations or any tips you discover along the way. Happy rolling, and remember—in sushi as in life, practice, patience, and quality ingredients are the keys to success!